
A potentiometer is a three-terminal resistor with a sliding or rotating contact that forms an adjustable voltage divider. Potentiometers are commonly used to control electrical devices such as volume controls on audio equipment. Potentiometers operated by a mechanism can be used as position transducers, for example, in a joystick.
In this project, we will learn to use these with an Arduino
Parts
10K Potentiometer x1
Arduino(any) x1
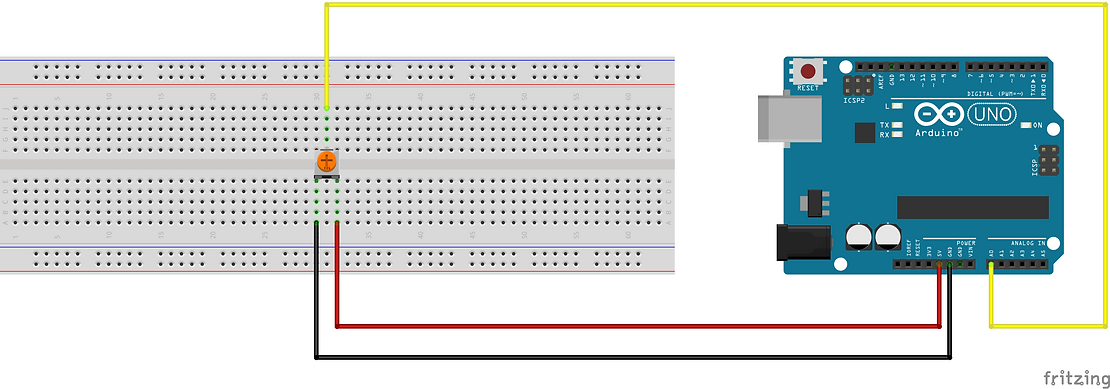
Wiring
Potentiometers are of different types, I have given the schematics of the 2 most common types.
Here’s the first one

Here’s the second one
Note
The wiring of the power pins can be interchanged, but the center one is fixed for data.
Code
void setup() {
  // put your setup code here, to run once:
  Serial.begin(9600);       //to begin the serial communication
}

void loop() {
  // put your main code here, to run repeatedly:
  int reading = analogRead(A0);
  Serial.println(reading);
}
How to get readings
You can get their readings on other softwares as well but I will show you to view them in the Serial Monitor and Serial Plotter in the Arduino IDE.
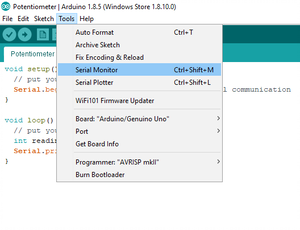
1. Serial Monitor
To open the Serial Monitor, click on Serial Monitor in the tools menu in the IDE.

If you have connected your Arduino and uploaded the code, then you will see some values coming in your serial monitor depending on your potentiometer. You can now rotate the adjuster of the potentiometer either by hand or a screwdriver. You will see that the values of the monitor also change.
2. Serial Plotter
To open the Serial Plotter, click on Serial Plotter in the tools menu in the IDE.


If you have connected your Arduino and uploaded the code, then you will see that a graph showing some value. You can now rotate the adjuster of the potentiometer either by hand or a screwdriver depending on your potentiometer. You will see that the graph also changes accordingly.
If you are new to Arduino, then,
